

Sunday, February 28, 2010
Bl**dy Gas Alliance
So leaving me without gas and therefore no heating, hot water or ability to cook for two days wasn't bad enough for the Gas Alliance, they have also left a hole at the end of my drive which means that I've been unable to get the van back onto the drive. This means no progress this week.

Sunday, February 21, 2010
Bl**dy weather!

Up before the sun today, planning to get lots done, unfortunately the weather gods had different plans.
You've been framed!
Saturday we had another shopping trip this time for some vinyl floor covering and some (rather wacky) fabric for the sofa/bed. As a result we didn't get lots done but we did finish wall board in the rear of the van and the frame for the window, which was challenging as it has to taper to follow the contours of the van.


Friday, February 19, 2010
But worth it
This is the first wall lined with the wall board. There will be some trim added later to cover the joins and screw heads but so far I think it looks pretty good.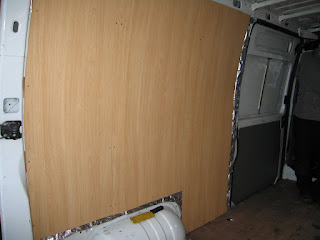
The wobbly nature of the board means that it easily follows the curvature of the van.

The wobbly nature of the board means that it easily follows the curvature of the van.
Damn this is tricky!
The wall board is 3mm ply with a vinyl facing, it comes in 8'x4' sheets and boy is it wobbly. Cutting these sheets to size and leaving a clean edge is NOT EASY!

Floor done, now for the walls


This insulation has five layers of aluminium foil so not only should we be realy toasty but we'll also be immune from those alien mind probes.
Thursday, February 18, 2010
It's all in the hip action

When drilling it's important to have a firm grip and apply steady pressure.
It goes down easy too
The time consuming part is sealing all the cut edges with aluminium tape. It's super sticky and surprisingly delicate.
It creates an effective barrier to moisture and drafts in addition to being a superb insulator.

It creates an effective barrier to moisture and drafts in addition to being a superb insulator.


Wednesday, February 17, 2010
Self mutilation
No DIY project is complete without shedding some blood.
The lesson here is to exercise caution when handling the piece of steel that you have just cut out to fit the window. The other lesson is that phone cameras don't always focus on the thing you want them to.

The lesson here is to exercise caution when handling the piece of steel that you have just cut out to fit the window. The other lesson is that phone cameras don't always focus on the thing you want them to.

Timber and glue
The batons have been glued to the floor with Sikaflex 512 and will be left overnight to allow it to cure.
From this angle you can see the timber frame that acts as a spacer for the window, also glued with Sikaflex.

From this angle you can see the timber frame that acts as a spacer for the window, also glued with Sikaflex.


OMG! I just cut a great big hole in my van!
So why am I smiling?
In this shot you can see my Keith (also smiling) in the vans interior. As any good workman knows it is essential to look after your tools. This particular tool is looked after by lubricating with a steady stream of coffee.

In this shot you can see my Keith (also smiling) in the vans interior. As any good workman knows it is essential to look after your tools. This particular tool is looked after by lubricating with a steady stream of coffee.

Then you join the dots... with a jigsaw
Note the duct tape to prevent scratching the paintwork.
The sawing is made easier by using a very fine toothed blade and by having a Keith, who stands on the inside and damps down the vibrations.

The sawing is made easier by using a very fine toothed blade and by having a Keith, who stands on the inside and damps down the vibrations.

Next drill holes in the corners
Some people drill a small hole in the corners (just enough to get the saw blade through).
I decided to drill holes with the same radius as the corner of the window that will fit through it.
I decided to drill holes with the same radius as the corner of the window that will fit through it.


First you clean
Having removed the existing ply lining you get to find out how much dirt has accumulated behind it.

Tuesday, February 16, 2010
A foraging trip.... to Grimsby!
Magnum Motor Homes is a devil of a place to find but well worth the effort. A narrow gap in a row of houses leads to a yard bordered by industrial units. Walking in the door is a real tardis moment, it's not wide but it goes back a long way and is jam packed with goodies. Several hours later, with lots of help and advice from the staff, the van is loaded with a starter kit for the motor home to come.
Well that was Saturday, today a trip to a local timber merchant and some internet shoping later and we might just have everything we need.
The van floor has been cleaned and painted and timber has been cut so that the lining out process can start tomorrow.
Well that was Saturday, today a trip to a local timber merchant and some internet shoping later and we might just have everything we need.
The van floor has been cleaned and painted and timber has been cut so that the lining out process can start tomorrow.
Thursday, February 11, 2010
To Quote Julie Andrews...

Let's start at the very beginning.
Why self build a motorhome?
Well the seed of an idea was planted about ten years ago when Jax and I were attending a motor racing event (I can't remember which). As usual it was raining and we saw someone with a camper van making tea and bacon butties and having somewhere comfortable to shelter between races. Jealousy is a powerful emotion!
Fast forward to 2009 and the purchase of caravans by Jax' sister and my mate Don. This encouraged the idea to germinate and become some serious research. The research almost became the hiker's hob nailed boot that trampled our little seedling. Have you seen the price of professional vans?!?!? Fortunately the research also turned up lots of information on vans that had been converted by their owners, so called "self build motor caravans".

On 21st November 2009 Jax and I became the proud owners of a 2003 Renault Master. The conditions of the insurance policy for which gave us 3 months to complete the conversion, lots of time (or so I thought!). Unfortunately Christmas, Snow and a breakdown, that kept the van in the garage for nearly 3 weeks, all intervened. The upshot being that the only work completed to date has been to remove the ply lining and clean the load area. This now means that I have to complete the conversion in one week. Not quite an episode of 24 but the pressure is definitely on.
Even Jack Bauer has help so Jax is taking on the role of Chloe O'Brien and my mate Keith will be playing the CTU agent who gets killed in the final act due to management incompetence. Watch this space!
A little Grandiose?
The blog title may seem a little grandiose but as it's about the journey of my Renault Master from humble panel van to bespoke motorcaravan and because I'm a Hawkwind fan it seemed an appropriate choice
Subscribe to:
Comments (Atom)