

Sunday, November 7, 2010
Three weeks later...
...and we were back at Silverstone again, this time to watch the BTCC race programme but this time flying solo.
Having appreciated the benefits of an awning on the previous trip we took the plunge and bought one for the van. It's a light weight, compact afair but plenty roomy enough all the same. It also has the benefit that it can be made weather proof and left in place if we want to go somewhere in the van.

As you can see the roof still awaits its lining, which is why I am cooking by head torch. Until the roof lining is up I can't install the overhead lighting

Not finished but useable
A trip to Silverstone at the end of July was used as a shakedown for the van. By way of an insurance policy caravan owning Brother-in-law Paul and friend Don (with respectively Antonia an Liz) were invited along for the weekend.
The wagons were circled and awnings errected on both caravans which provided a large covered area for chilling, dining and drinking.

Jax, about to snuggle down in our king sized bed, not even the factory built caravans can boast one of these.

We had a great weekend with friends and family but as you can see from the leaden skys we broke camp none too soon.

Tuesday, July 13, 2010
Nothing worth a picture.... Oh wait a minute!
The work I did this week was all about catches, handles, and straps for respectively keeping things closed, pulling them open and holding them down. Unfortunately none of it makes for very interesting pictures. So instead I'll have to show you what Jax has been up to...
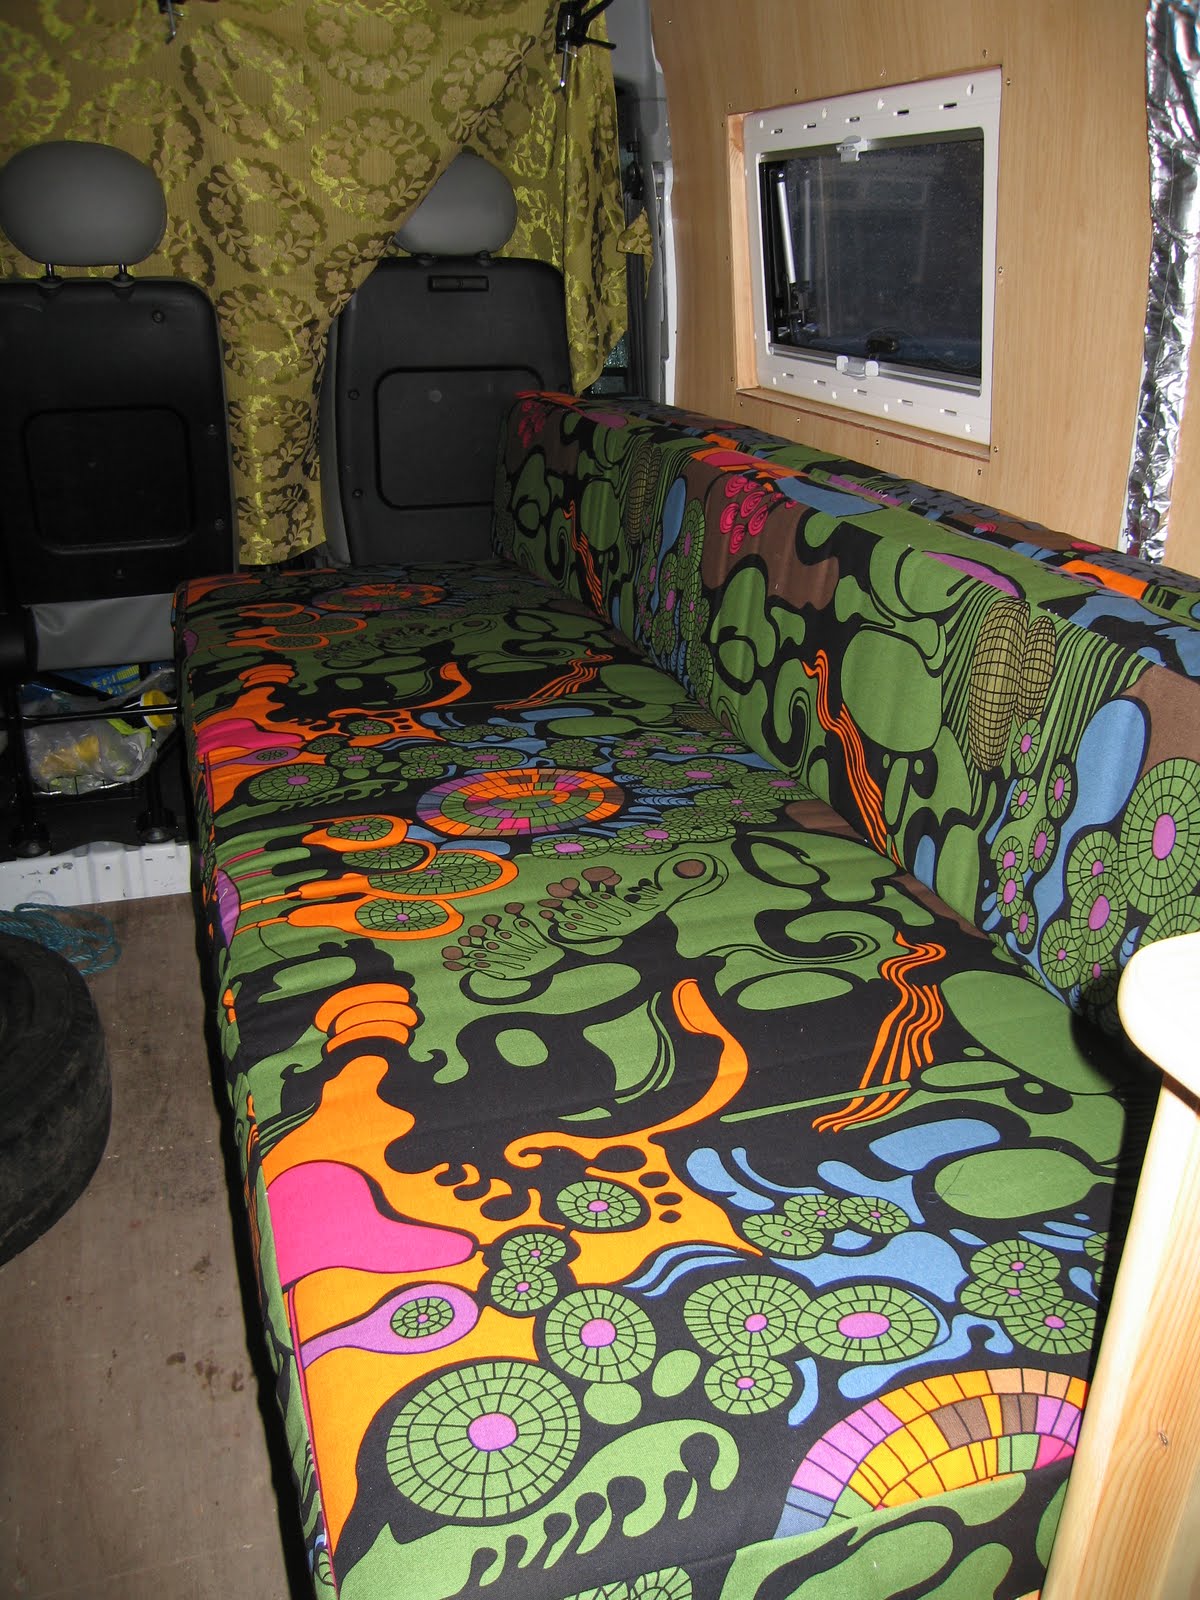
The sofa bed now has covers, made from fabric that we like to describe as exuberant!
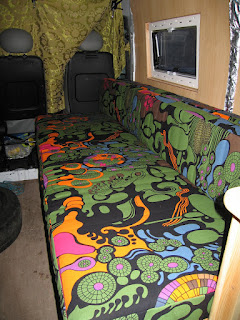

The sofa bed now has covers, made from fabric that we like to describe as exuberant!

Sunday, June 27, 2010
More work done on the kitchen unit
The folding tap has been fitted and the shelf that supports the water tanks (1x fresh, 1x waste) has been installed. There are substantial batons under the shelf as the tanks will weigh in at 25kg each when full.
Ideally the tanks should be different colours so that they don't get mixed up but I got the pair for less than the usual cost of one so I'll just buy a big permanent marker with the money I've saved.

Ideally the tanks should be different colours so that they don't get mixed up but I got the pair for less than the usual cost of one so I'll just buy a big permanent marker with the money I've saved.

Loo locker in action
The portaloo locker is now finished. The double folding action is shown in the pics and video.
The locker will provide an additional seat plus it will support one end of the bed when extended.


The locker will provide an additional seat plus it will support one end of the bed when extended.


Sunday, June 13, 2010
Do the cushions fit?
I'm pleased to say the cushions DO fit (well done Jax!)
You can also see the single-seat locker that will be home to the portaloo (yes it will have sides on it when finished). This will also do double duty as the support for the one end of the bed.

Jax confirmed that the seat is comfortable.
Now that we have proved the concept Jax can press on and make the covers. For me the ToDo list includes finishing the loo locker, installing the sink and putting the shelf in for the water tanks. Once this is done we will have a workable camper.

Tuesday, June 8, 2010
What? Two updates in one day?!?!?
The work on the kitchen units was from two weekends ago, last weekend we made a start on the soft furnishings.

The mattress is going to be cut into 3 to form the seat and a double thickness for the backrest.

The secret to cutting the foam is to start with a very, very sharp knife and then to run the blade along a good straight edge.

Jax sewed some extra panels to the existing cover to close over the cut edges. You can see the first one in the pic. Getting the cover back on the foam was a bit of a tussle even with two of us pushing foam and tugging cover but once on it proved to be a good snug fit. A rather groovy outer cover follow.
Oh!.... now I see
So it may have seemed that nothing has been happening for a while but now you can see that I've actually been busy making the kitchen units.

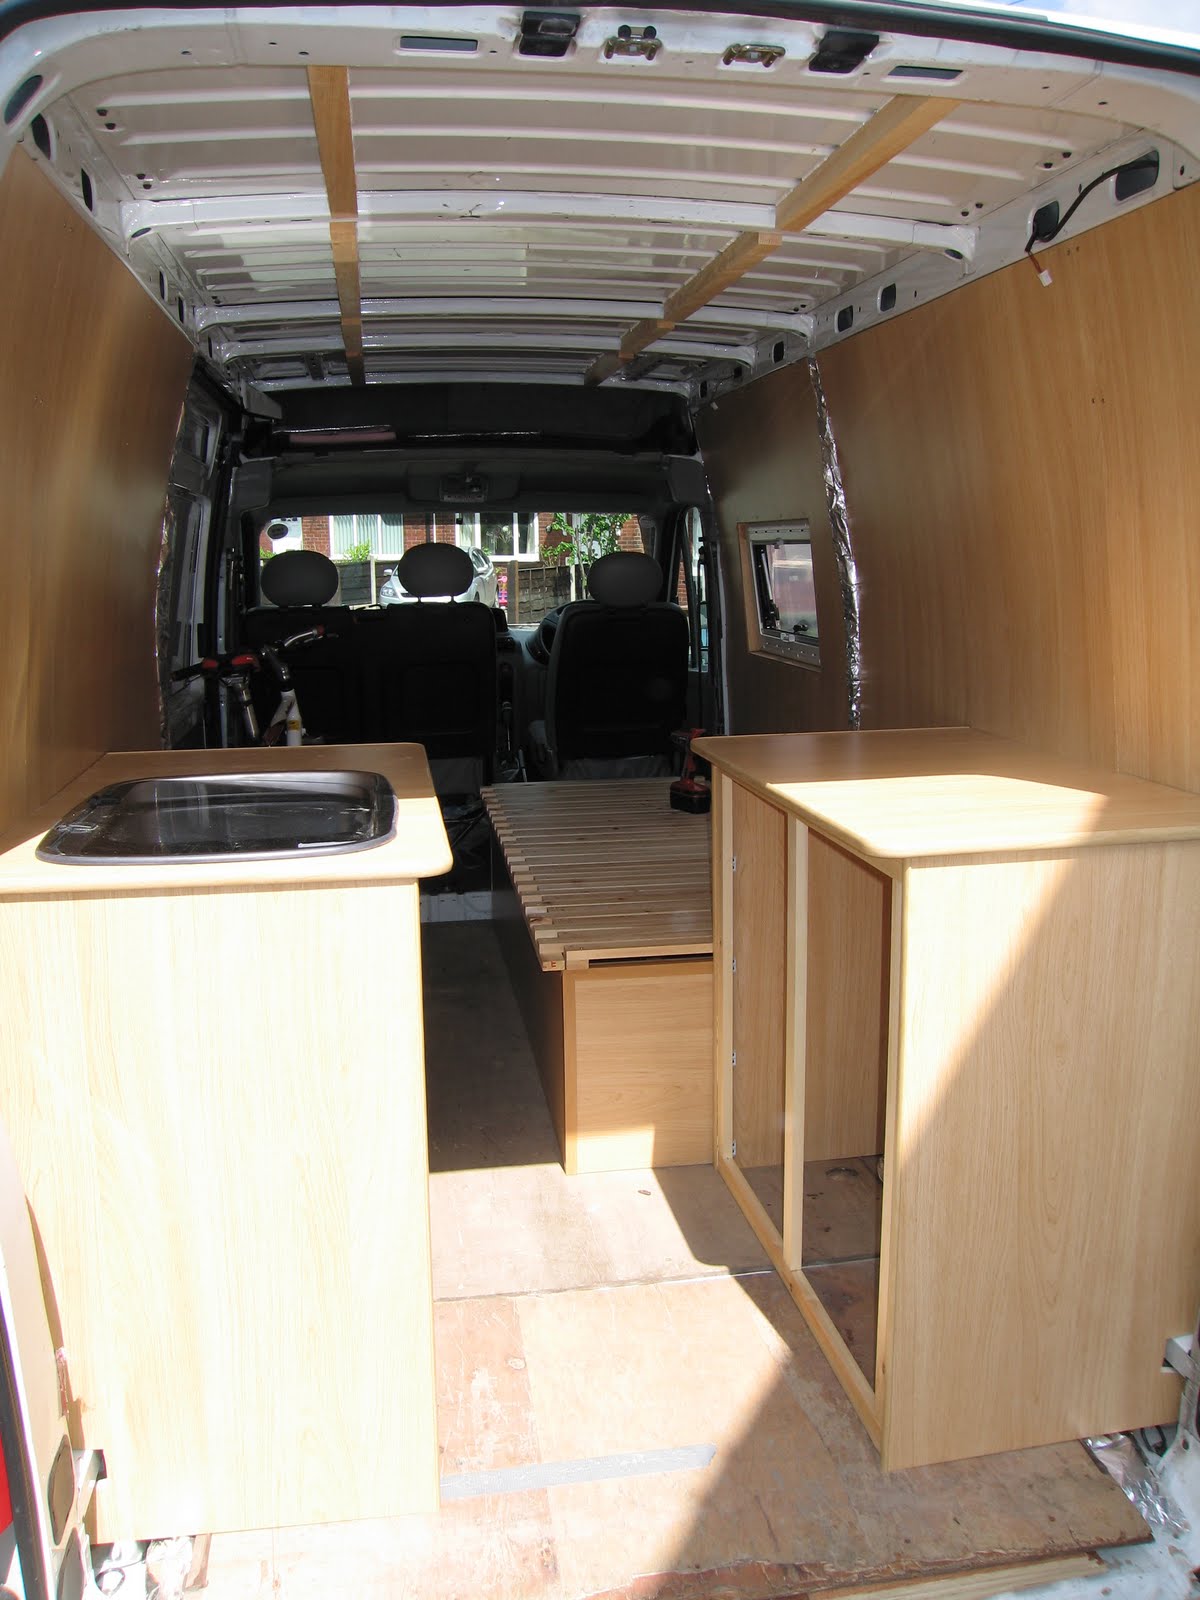
This first unit will be home to the Double hob and grill (on top), and the fridge (yet to be purchased). This is located on the offside of the van to keep the cables from the leisure batteries as short as possible to minimise volt drop (a major concern when you only have 12 volts to start with).
On the right of the picture you can see the frame that will become the other unit.

Very nice work, thought I says so myself.

The second unit with sink dropped in. This will be home to two 25 litre water tanks, one for fresh and one for waste. I have a tap with a microswitch which will operate a submersible pump dropped in to the fresh water tank. According to my mate, Mr Newton, this new fangled gravity stuff will take care of returning the waste water. Both tanks have integral wheels and a fold out handle for moving around when full. It's a good job they're not tartan or they'd look like granny's shopping trolley.

Mrs K demonstrating the position she'll be adopting on our upcoming trips.

Mr K demonstrating the position he will be adopting.
(Note: This above is of course a fantasy resulting from to much sun falling on the baldy head of Mr K. In reality the positions will, of course, be reversed)

This first unit will be home to the Double hob and grill (on top), and the fridge (yet to be purchased). This is located on the offside of the van to keep the cables from the leisure batteries as short as possible to minimise volt drop (a major concern when you only have 12 volts to start with).
On the right of the picture you can see the frame that will become the other unit.

Very nice work, thought I says so myself.
The second unit with sink dropped in. This will be home to two 25 litre water tanks, one for fresh and one for waste. I have a tap with a microswitch which will operate a submersible pump dropped in to the fresh water tank. According to my mate, Mr Newton, this new fangled gravity stuff will take care of returning the waste water. Both tanks have integral wheels and a fold out handle for moving around when full. It's a good job they're not tartan or they'd look like granny's shopping trolley.

Mrs K demonstrating the position she'll be adopting on our upcoming trips.

Mr K demonstrating the position he will be adopting.
(Note: This above is of course a fantasy resulting from to much sun falling on the baldy head of Mr K. In reality the positions will, of course, be reversed)
Monday, May 17, 2010
Following huge demand...
...from my many fans, I thought an update was long overdue.
The bed is now finished and the panels for the kitchen units have been cut.
Marking out and cutting the hole for the sink was a challenge that required blending three different curves. There was lots of checking before I unleashed the jig saw but the result was close to perfection with just a couple of millimeters of clearance all round.


Edging the panels required cutting a 2mm slot exactly in middle of the edge all the way around. Clearly there is no way that this can be done with hand tools and trips to B&Q and Screwfix didn't help. It took some tracking down but eventually Axminster tool centre came up trumps with this slotting bit for my router.

Having cut the slot all I had to do was whack the trim in place with my rubber mallet.

Taking the trouble to find the right tool for the job was well worth it as finish looks very professional.
Sunday, April 11, 2010
Starting to add the cladding and trim to the bed.
The cladding matches the walls and a darker contrasting trim has been added to hide the panel pins

This angle shows how lovely the weather has been this weekend.


This angle shows how lovely the weather has been this weekend.

More work on the sofa/bed
The end and centre frames have now been made so the frame for the sofa bed has been assembled and tried for size in the van.


We dropped the matress on so that Jax could test the comfort.


We dropped the matress on so that Jax could test the comfort.

Friday, April 2, 2010

The lids for the sofa/bed/storeage locker are now finished.


After a trip to the timber yard and between Good Friday rain showers I've managed to finish the extending lid for the for the sofa/bed/storeage locker.
Saturday, March 27, 2010
How do you make a sofa that converts into a bed?
Simply put you make a box and give it a lid that telescopes to double its size.
OK! But how do you do that?
Well since a picture is worth a thousand words, here's 3000.
This is one half of the lid. It is in two halves to reduce the weight that will have to be lifted when accessing the storeage underneath.
The reason for the gap in the middle is that I've used up my supply of timber so I shopping trip is needed to finish this and to make its twin.
When completed the bed will be 2m x 1.4m, big enough even for me!


Sunday, March 21, 2010
I could have been riding my bike...
Yesterday got rained off but today was lovely. The bike group was on a run and the temptation to get the gear on and go for a ride was very strong. If I'd got some work done yesterday I'd probably have succumbed . However conscience got the better of me and out came the power tools.

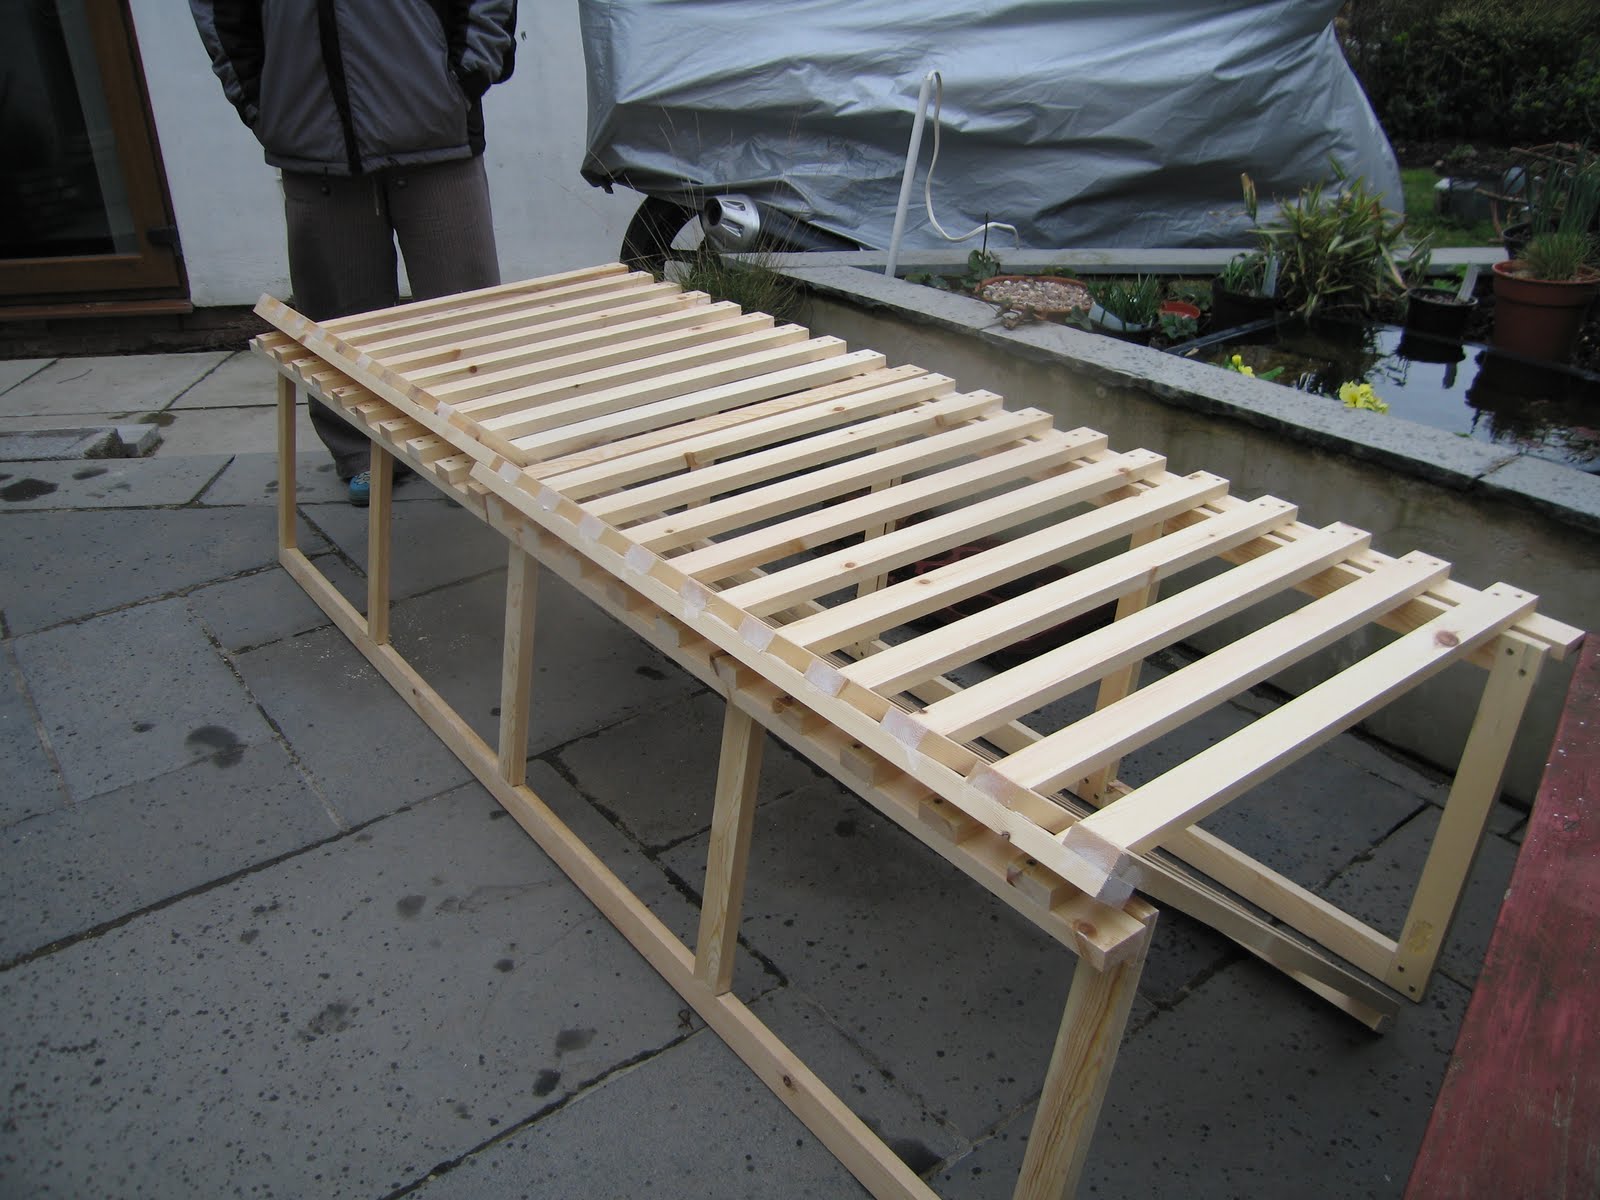
The second section of the sofa bed is now done. I propped the sections up so that you can see how they will go together.

The second section of the sofa bed is now done. I propped the sections up so that you can see how they will go together.
Wednesday, March 17, 2010
That's not all...
Just in case you thought that was all I'd achieved last weekend here is the evidence that I'd also trimmed back the foam and fitted the wall panel over the window and made a ply box to surround the offside wheel arch.
The channel running up the middle of the van is where the cables for the lighting will run. A removable cover will be added later.


The channel running up the middle of the van is where the cables for the lighting will run. A removable cover will be added later.


I got the power! (credit: Snap 1990)
After several hours of chipping away at bits of wood I've discovered that I don't have the requisite skills with hammer and chisel to form even the simplest of timber joints. Having never had woodwork classes at school (or since) this should not have come as any surprise, however as I had a book and the arrogance of the uninitiated it was a bit of an eye opener.
Fortunately being a gadget nut I have accumulated an impressive array of power tools, so having admitted to myself that I am no master craftsman I delved into the dark recesses of the garage and liberated the router from the "I'll find a use for that, one day" shelf. Well that day had arrived and although initial caution was exercised (this is a scary machine) I was soon removing wood with sufficient precision to make some very tidy joints. All the while this sound track was playing in my head
 This is the fruit of my labour, the first section of sofa-bed.
Monday, March 8, 2010
Ever discovered something was harder to do than you thought?
Well I just have.
Having cut the wall panel that will go over the window (which required lots of "offering up" and trimming of the profile) I needed to insulate around the window. I could have used my hi-tech blanket but it would have to be cut into small pieces, so instead I decided on expanding PU foam in a can... because I thought it would be quick and easy!
How wrong was I?
The instructions explained that the foam is cured by moisture so the surface should be prepared by being made clean, grease free and moisturised! And this is where the problems began. The surface is inclined gloss paint which I'd damped down with a water spray and I was trying to get a liquid to stay where it was put.... platting fog might have been easier!

The only thing that seemed to work was applying small blobs, leaving them to cure and then coming back to add blobs between the cured blobs. The whole process took nearly a full day and looks like something from a horror movie.
On the upside, following some trimming, the wall board can now finished which means that I can now start on the furniture.
Sunday, February 28, 2010
Bl**dy Gas Alliance
So leaving me without gas and therefore no heating, hot water or ability to cook for two days wasn't bad enough for the Gas Alliance, they have also left a hole at the end of my drive which means that I've been unable to get the van back onto the drive. This means no progress this week.


Sunday, February 21, 2010
Bl**dy weather!

Up before the sun today, planning to get lots done, unfortunately the weather gods had different plans.
Subscribe to:
Comments (Atom)